Sunday, December 22, 2013

4th & 5th Days of Bathroom Renovations

Day 4 was a little slow as Ana didn't feel well and I spent a lot of it at various hardware stores buying some things and picking up orders for others.  Also I ended up spending half the day working in the attic, following the trail of moisture from the sources up through the walls and into the between-joist spaces.

I originally went up into the attic to pull up a board to determine what I had to work with for between-joist space for a vent / fan and light setup for the shower.  Found more than I was looking for - some of the attic decking had to come out as there was no way to dry out and clean the space otherwise.

It appeared to me that the water vapor from the shower went up through the walls, passed through the insulation, touched the cold attic floor, condensed, and then fell back on the insulation.  Some of it was sopping, and this was more than three days after the shower had last been used.  I pulled all the boards with mildew on them and all the insulation, but the plaster under the insulation was dry.  This could have been so, so much worse if the plaster was soaked and the joist rotted through. As it was, some bleach, drying time, and better moisture management ought to fix the problem without requiring structural changes or bringing the ceiling down (we're planning to put fresh drywall over the old plaster for the ceiling).  I can replace the cut decking with pieces off the sides, it isn't even for some reason so it won't even look strange.  Won't look quite good as new due to the cut line, but it is an attic, not a living room - will be good enough and a lot better than it would look distorted by water and rot.

For day 5 I redid the register box in the room to be in the wall, not half-in-the-wall-and-half-in-the-floor, we pulled the tub, most of the floor, and some additional lathwork, and discovered that one of the major sources of moisture problems we've been finding is that the shower plumbing straight-up leaks.  This has probably been like this for years and was definitely the source of some of the bulging plaster.  With the tiles buckled, that allowed the moist air up the walls into the ceiling.  I am not sure why this problem didn't come to a head when the previous owners had the place - must have build up over time and then maybe reached a critical point recently that made things worse faster.

Ana looked up pictures of various forms of mildew and mold on the internet and determined that ours are of non-toxic varieties (good), are surface-dwelling and generally don't compromise structures (really good), and can be killed with bleach and scraped off without replacing boards (best).  So while we have already junked some scungy laths, we should be able to salvage most of the big stuff and have reason to believe that after we finish evil will not be undoing our work.  We're going to bleach and scrape twice, with about a week's drying time between them when we're going to pause and go to Buffalo.  First round of bleach went on today, so first round of scraping is tomorrow.  Will probably work on something else as well, haven't decided what yet.  With only one more day before driving to Buffalo I don't think going after the plumbing or electrical stuff is ideal, we'll see how it goes.

Thursday, December 19, 2013

3rd Day of Bathroom Renovations

Once you've removed the plaster, you have two options for hanging drywall. You either hang it over the laths, as long as they are still in decent shape and uniform enough, or you can remove all the laths and mount it directly on the studs. We're planning to do the former for most of the bathroom, but the laths on the outer wall were far too nasty for that. Day 3 included pulling out the insulation and laths from the outer wall so we can see how damaged that it really is and prepare for drywall as well as tidying up laths around the room, removing the medicine cabinet, and some other cleaning-up tasks. We also did some school stuff and didn't spend too much time on the bathroom.

Now with added towel for privacy!

As you can see, the wall beneath the window is still pretty gross. We're going to let it continue to dry out and consider our options once we've got the ventilation, wiring, and ductwork fixed. For Day 4, some of those are up for grabs.

Wednesday, December 18, 2013

2nd Day of Christmas...Bathroom Renovations

Update from the front - plaster is off the walls and hauled out, probably 700-800 pounds worth given the number and weight of the bags.  I think carrying that out was more work than getting it off the walls.  We went full bunnysuits and respirators for today and that was a really good idea - super super messy and anytime the plaster was overhead some would come down on us.

I talked to a glass place about the window and it is kind of a specialty need, so we're getting a custom-made shower-glass-on-the-inside-double-pane-for-insulation unit made for us, seems like a good deal for $120 for more than six square feet.  I will still need to build a new frame around it and we won't have it for a month (I didn't want to do anything until I'd seen the internal structure there so we couldn't order until now). We'll have to work around the existing window for a bit, but I feel good about the eventual outcome. The new one will be somewhat bigger than the existing window and we're going to use some of the extra width from removing the counterweights to actually center the window (currently 2 inches closer to the left wall than the right), which will make tiling easier and better-looking. Overall it should add a lot of light, especially since the whole thing is frosted and we won't need to have blinds over the window all the time to obscure the shower and toilet from the neighbor's front-door view.

 The joke around here is that if we liked that rustic look we'd be done. We are not done.


Tomorrow there are  a number of projects to potentially undertake, including clearing all the little plaster bits out of the lathes, pulling down the ceiling (don't even know what it is made of yet), pulling out anything and everything with mold on it, moving the tub, and installing an in-wall register box for the vent unit. Almost certainly won't finish all of that but we'll see how it goes.


Also the roofers were roofing today and it scared the cats half to death. They ended up cowering in the 'cat cave' made out of a blanket draped over a chair. Sometimes they would sit on the seat (under the blanket) and sometimes on the floor but they never went far from it from 8-5, and since Ana and I were still working in the bathroom until ~6, they weren't really calm until we packed it in for the day around 7. Ana put out food and water for them near the cave. They will definitely not like tomorrow either; the roofers will be back in force. Between the noise they're making and the noise we're making, it is properly noisy around here.

Tuesday, December 17, 2013

The First Day of Chris- er, Bathroom Renovations

We just made it to the Christmas break, which means it is time to kick back, relax, and completely gut and redo the our only bathroom. While this is not in fact so relaxing, in the last couple of months it has become very clear that the area around the shower is not water-tight and that Bad Things have been going on behind the tile. The window also grew a mushroom.  Feeling no need to have to replace the house after allowing rot to cave in the north wall, the bathroom swiftly moved much higher onto our priority repairs list. This is the first break since that priority shift and so our first chance to really take action. Given that the wall themselves are distorted and bowed in places due to expansion of the plaster, options short of a complete redo are limited, at least if the results are to be anything worth looking at. Unless we're too tired, there is a good chance of daily updates on this project for the next week or so.

Those tiles pushing outward - not a good sign.


In the morning, it looked like the picture above.  We didn't get started on the tear-out until mid-afternoon. In the evening, it was looking more like this:


All the tile has been removed except a small patch behind the toilet. We're planning to keep the toilet in as long as possible and replace it as quickly as we can, since it is the only bathroom in the house. We also managed to tear out a few patches of plaster and drywall that was around the tub, revealing a foul patch of mold under the window. We will definitely be pulling out anything with mold on it.  Tomorrow we will remove the vanity and a lot more plaster and Lee may build a new window.

Saturday, November 16, 2013

Conservation of the To-Do List

So, within 36 hours of replacing the microwave and 24 hours of finishing the floor, our TV and food processor both broke, neatly adding two replacement items onto the to-do list.  Didn't quite cancel out previous efforts but it was pretty frustrating.  Fixing the food processor was a drop-in part fix and no big deal but TV's are a more complicated and potentially dangerous* repair.  Given that the TV is only about 18 months old I wasn't just going to replace it without a fight, even after determining that even having someone else look at the TV was going to run me close to half the replacement cost.

Through the magic of the internet I determined the most likely failed component (the power supply board), then opened up the TV to look at it.  I didn't detect any blown capacitors or obviously fried circuits, but when I found someone in Arkansas selling used replacement boards on Ebay for $18 I figured it was a solid gamble to just replace it and see what happened.

My trusty home repair assistants.  They took care of the packing peanuts and bubble wrap while I handed the TV.

For once, a fix was almost as easy as possible.  One bolt holding the back panel of the TV on was sticky and I wasn't able to remove it without significant cam-out of the Phillips head (they should have used Torx, Phillips was actually designed to encourage cam-out to discourage over-torquing before the advent of accurate torque wrenches - fun bolt fact of the day) so I tossed that one, but there are about 20 screws holding the back on so losing one is not a huge deal.  There were only three connections to undo and redo and all of them had solid, clicky connectors instead of being obnoxious glued on ribbon cables or anything.  Made the connections, didn't ground any capacitors through myself, fired up the TV and it worked, so I replaced the back panel and we were back in business.  I seem to have lost my settings (probably the reserve battery was on the board I yanked so the volatile memory of the TV blanked) but they weren't a big deal to put back in.

For $20.50 with rush shipping and only a couple hours of my time total, counting research, I feel pretty good about that repair.  Apparently unless the panel itself goes, repair of modern plasma and LCD TV's can be pretty approachable, especially considering I only saw estimates in the $200-300 for an initial diagnosis of a TV problem, plus at least $100 for someone else to make this fix for me.  I could replace every board in that thing several times (at used part prices) before meeting the cost of having someone look at it.  Good to know, especially since there is a 5-10% chance that the board I just put in has the same flaw as the original and will die in the next year or so.  If it goes I'll just buy another one and slap it in.

Victory was tempered, however, by a further example of conservation of the to-do list.  After replacing that food processor component but before fixing the TV, I had the furnace guys in for an annual service.  Apparently since the spring when the AC guys looked at the AC coil the coil had developed a leak, which either overflowed or otherwise escaped from the AC drip pan and drain...and dripped down onto the furnace heat exchanger.  It rusted and is beginning to crack.  Carbon monoxide levels are a long way from dangerous but are above legal limits coming out of the vents and approaching the levels where noticeable symptoms of exposure begin to manifest.  The furnace is only 8 years old  and I was not anticipating problems with it (and only had a five year warranty so no joy there, I checked).  The repair is 80% of the cost of a new furnace and doesn't make any sense to undertake.  This was detected less than 18 hours after fixing the food processor.  So it was with some trepidation that I pronounced the TV fixed.  It has been about 15 hours since then and I am just positive that something else is about to break today.

I think I need to find at least five or six things that I don't care about that are not currently broken, break them, and see if other problems resolve themselves automatically. Or perhaps I can set up some sort of altar in the utilities room and sacrifice power tools to the dark gods of homeownership.  The one-thing-fixed-another-one-breaks vibe going on here is getting creepy.

Well, can't complain too much.  Our costs to own so far have been far, far less than the cost of renting an equivalent house by my calculation so even tossing in a new furnace isn't exactly going to make the math ugly, just less pretty, especially since that was not a cost we were expecting.  We'll recoup some money on heating savings and a new furnace sure won't make the house sell any more slowly when the time comes.  I am honestly more irritated at having to take out the time to solicit bids and meet with contractors than the cost.  Also the paranoia about something else breaking is getting pretty strong.  I keep expecting the water heater to detonate or the fridge to puke its guts out on the floor.  Since we're dealing with paranoia and evil spirits, not rational engineering and probability, I will accept any magical or spiritual help my readers care to donate.  In the meantime, I guess I'll just keep working.

*CRT TV's have 30,000+ volt potentials around the tube with more than adequate charge to kill you like a bug zapper.  I would never open a CRT.  This plasma TV, when unplugged and properly discharged, tops out around 400V with smaller capacitances.  Field reports indicate a serious error would leave your arm numb for a couple of hours but generally not kill a healthy adult.  I felt no need to be electrocuted and exercised due caution not to ground any of the caps through myself, completing the swap without incident.

Sunday, November 10, 2013

Front Room Flooring Campaign

This entry is pretty close to a cut-and-paste from our house changelog file.  I named this a "campaign" because "project" doesn't seem to cut it at this point.

The front room had a nasty pink/gray carpet stained by years of smoking.  We pulled it up and discovered about 80% of a hardwood floor.  Frankly, we'd been hoping for all of one.  It was very apparent that there had been termite damage to several dispersed parts of the floor, some of which had been crudely patched.  We weren’t keeping the carpet anyway so we pulled that and the tack strips keeping it down.

Original pink / gray carpet
Termite damage to boards adjacent to fireplace

This astonishingly crude patch seemed to have been made from a section of fencing – the taper for the top of the fence was still visible at the ends of the boards. 

Bottom of some termite-damaged boards – some of these crunched and gave when you walked on them – presumably the infestation was discovered when someone crushed the patched area.

Substantial sections of the boards were raised and fresh felt paper was laid under as it had been chewed through by the termites previously.  The subfloor seemed entirely fine to me / free of termite damage, from both sides, so it was left alone.  Guess it wasn't very tasty.  Fresh red oak flooring (same material as old flooring) was purchased to replace the damaged boards.  Undamaged boards were retained (at least the ones I bought up off the subfloor without shattering them) and we mixed new and old boards when installing the patches to make the sections blend better.  I bought unfinished because the whole thing will need sanding and finishing at the end anyway and they're cheaper that way.

A damaged section of flooring also ran near one of the baseboard vents, which made it make sense to replace the vent there with a floor vent in the double-width gap already cut in the floor before we got there (see top left of picture above).  The ducting in the crawlspace was re-routed and re-hung to this location next to an existing vent, also re-insulated without the use of twine (HVAC tape people, how hard is it?)  New register boxes were installed as well, with a patch to the subfloor around them to support the whole deal.


Flush-mount wooden register grates were installed – looks pretty slick to us.  I used splines around and between the register grates so the tongue-in-grove runs all the way around them.  The baseboard vent grating would have been where the rightmost strip of new boards touches the wall.

Lots of hammering later it all looked pretty good but there was one problem.

There was a gap where the patch met original flooring of about 1/4" or so – very visible and not good enough for me. The entire tongue of the boards in this gap could be seen and the whole run had to be face-nailed in place until I figured out how to do a better job.  Apparently between the new boards and the good job placing the patch the same number of boards didn’t cover the same space.  This gap was eventually addressed by purchasing 3/4” thick face-planed red oak boards of width wider than needed, cutting them to the correct width, and making custom floorboards with them for that run using a router and jig setup.  Between this and some hardwood splines tongue-in-groove was put in place for the entire run and the gap is now eliminated. 

Making those custom boards took a long time (about 75% of it on setup and test, manufacture was actually pretty quick) but man they went in nicely.  I’m proud of those suckers.

Tongue-in-groove was also added for that entire run – note negligible gap.  You can’t tell which ones I made from the others without a ruler or really staring at which run is slightly bigger.  The boards were driven in from one side rather than dropped in and did not require face-nailing (except the last one which had to be drop-in short of taking out a wall) to be absolutely solid.

That takes this floor to "ready for sanding and staining" along with most of the rest of the house.  I may put those flush-mounted registers in in some other places and the floor is slightly missing around one grating in my office (you can see into the basement), but overall those efforts are single-afternoon affairs.  This - this was big.  Seems likely to be 100+ man hours all told.  I am so glad to have finished, every time I walk by the room I am happy to see it (and all the tools, etc) not there waiting for me any more.

I also installed a new microwave over the range (old one died, been using the one from Japan in the meantime) and replaced the tacky neon blue / clear plastic fan in the kitchen with a light fixture, amongst other things I shall probably not blog.  First few months of term absolutely nuts, didn't work on the house from the end of July until mid-October.  Finally beginning to make up for it now.

Tuesday, September 10, 2013

We've Heard Of This 'Football' Thing

A typical weekend finds us catching up on the work from the week and attempting to perhaps get ahead on that or work on a long-term project like the house.  Seven days a week is generally just not enough to do what we're trying to do, and we mostly use all of it trying.

 A fairly common weekend setup for me actually - what you can't see is it takes two mice and two keyboards to run as I haven't bothered to set up a KVM switch for the work laptop seen to the right.  I keep the workflow guide for the program I am using (I wrote the guide, idiots wrote the program) on the laptop so when I find a mistake in something I can make the changes immediately before I forget.  In this case the center screen is the actual work item and the two satellites are reference materials, music, and email.  I was considering going to five main screens but I'd have to add another video card - next computer perhaps.  Anyway, back to the actual blog post...

This weekend, we accomplished a slightly less serious task as we decided to take care of an action item that has been pending since we got here - go see a school football game. Purdue's first home game of the season was against Indiana State and we went to see what college football at Purdue was all about before the term got even busier.


With all the hype and bustle on campus associated with the football team and game days, we really expected both the game and the overall event itself to be pretty exciting.  Purdue is part of the Big Ten and therefore 'serious' national football.  The large number of people tailgating and driving in and generally being festive outside the stadium and the $20 price to park in a field literally a mile away (the buses don't run early enough to get us there for noon on a Saturday) would seem to agree.


However, at least compared to the NFL football which is primarily what I've seen before this, the game did not seem particularly high-end.  There were a surprising number of obvious mistakes made by both sides (people just plain dropping the ball, Purdue's utter and inexplicable failure to run out the play clock in the 4th quarter to the astonishment of the crowd) and the play often seemed hesitant, like they didn't quite know what to do.  Now, this was the first game of the year for one team and the second for the other, so maybe that's some level of inexperience at work, but I thought with all the hoopla that the action would be a bit more awesome.  There were a lot of supporting bands and cheerleaders but the crowd was not that worked up most of the time.  I also feel like they charged too much for tickets because the stands were not full - though in the picture below they look empty mostly because all those hundreds of people on the field walked down from their seats in the stands.


The halftime show was a collection of many local and not-so-local marching bands playing, as shown above.  You could mostly hear them and tell what they were playing, but it was nothing particularly special.

Overall, that is about how I feel about Purdue football.  I thought it was perfectly adequate but not outstanding entertainment.  I assume later games against rival teams may be more energetic on the field and in the crowd, but this one was a little tame.  Afterward we went home, napped, and then went out to eat and to the movies (Saw "The World's End") making the day almost completely off (our first since leaving NH in early August) and overall I would recommend the movie to the game.  Glad to have gone anyway to find out what we were missing and get a little taste of school spirit.  I won't say we won't go to another game, but I can also say I won't feel as bad missing them while working on other stuff from now on.

Monday, July 29, 2013

Indiana Dunes State Park

We took a day trip up to Indiana Dunes National Park (along Lake Michigan) and while I'm not going to talk too much about the trip itself  the pictures are nice so I posted them here.  Basically, we met up with some friends and drove about two hours to walk a seven-mile hike that was not as challenging as anticipated but was pretty. Also it didn't rain when it threatened to and I appreciate that.  All pictures on Flickr.

The trail went pretty much halfway out through the woods and past some lookout points and then back along the beach.

 Didn't see much wildlife, this was about it.

 OK, I lied, this wildlife is pretty frightening.

 Did see some wildflowers.

 Clouds were really dark and heavy but it did not rain.


 If you look closely at this set of shots you can see Chicago on the horizon, might need to look at the original here.

At one point the trail in the woods was deep white sand for a couple hundred feet, which was kind of surreal in the arboreal surroundings.

Overall a nice day trip, especially as we haven't had time to explore much of anything Indiana has to offer before.  As previously mentioned, the rest of the pictures are posted on Flickr.

Wednesday, July 17, 2013

The Rose Garden

In addition to finishing the front garden we also created a small rose garden last fall. Just like the plants in the front, we purchased most of our plants from Uncanoonuc Mountain Perennials and traveled all the way from New Hampshire with them. We didn't show it off before because it was finished late in the season so there were few blooms left on the bushes. We also used one rosebush that was already on the property, but when we transplanted it, it went into shock and was looking pretty pitiful. The branches were all okay, but the leaves and blooms all shriveled and died as the plant went into lockdown mode to survive the transplant. Now that it's spring midsummer and we can get some pictures of the blooming roses, we'd like to share what we did last fall.

We started with a jungle. The corner by the garage was absolutely covered with weeds and climbing, spreading plants. By the time we started digging things out, there was roughly eighteen inches of some kind of creeping plant, originally from the trellis against the house, covering everything:


We began by tearing out any obvious weeds and the 18" of creeping vegetation, and were surprised by what we found:


This was obviously a well-cultivated area, with some rose bushes, some yucca plants, lamb's ears, daylilies, and a, well, profusion of purple profusion, as well as decorative rocks and other plants and/or weeds. We pulled out and Freecycled the majority of the plants that were good, solid specimens we didn't have an interest in. That included the daylilies, yucca plants, lamb's ears, and the smaller rosebushes. We were able to make some people very happy, which made us (or at least, Ana) happy. Once we pulled out the better plants and the large rosebush, which we would be keeping, we used heavy-duty Roundup to kill the rest, mostly weeds and that purple profusion that keeps showing up everywhere. Roundup does not seem to work on purple profusion.


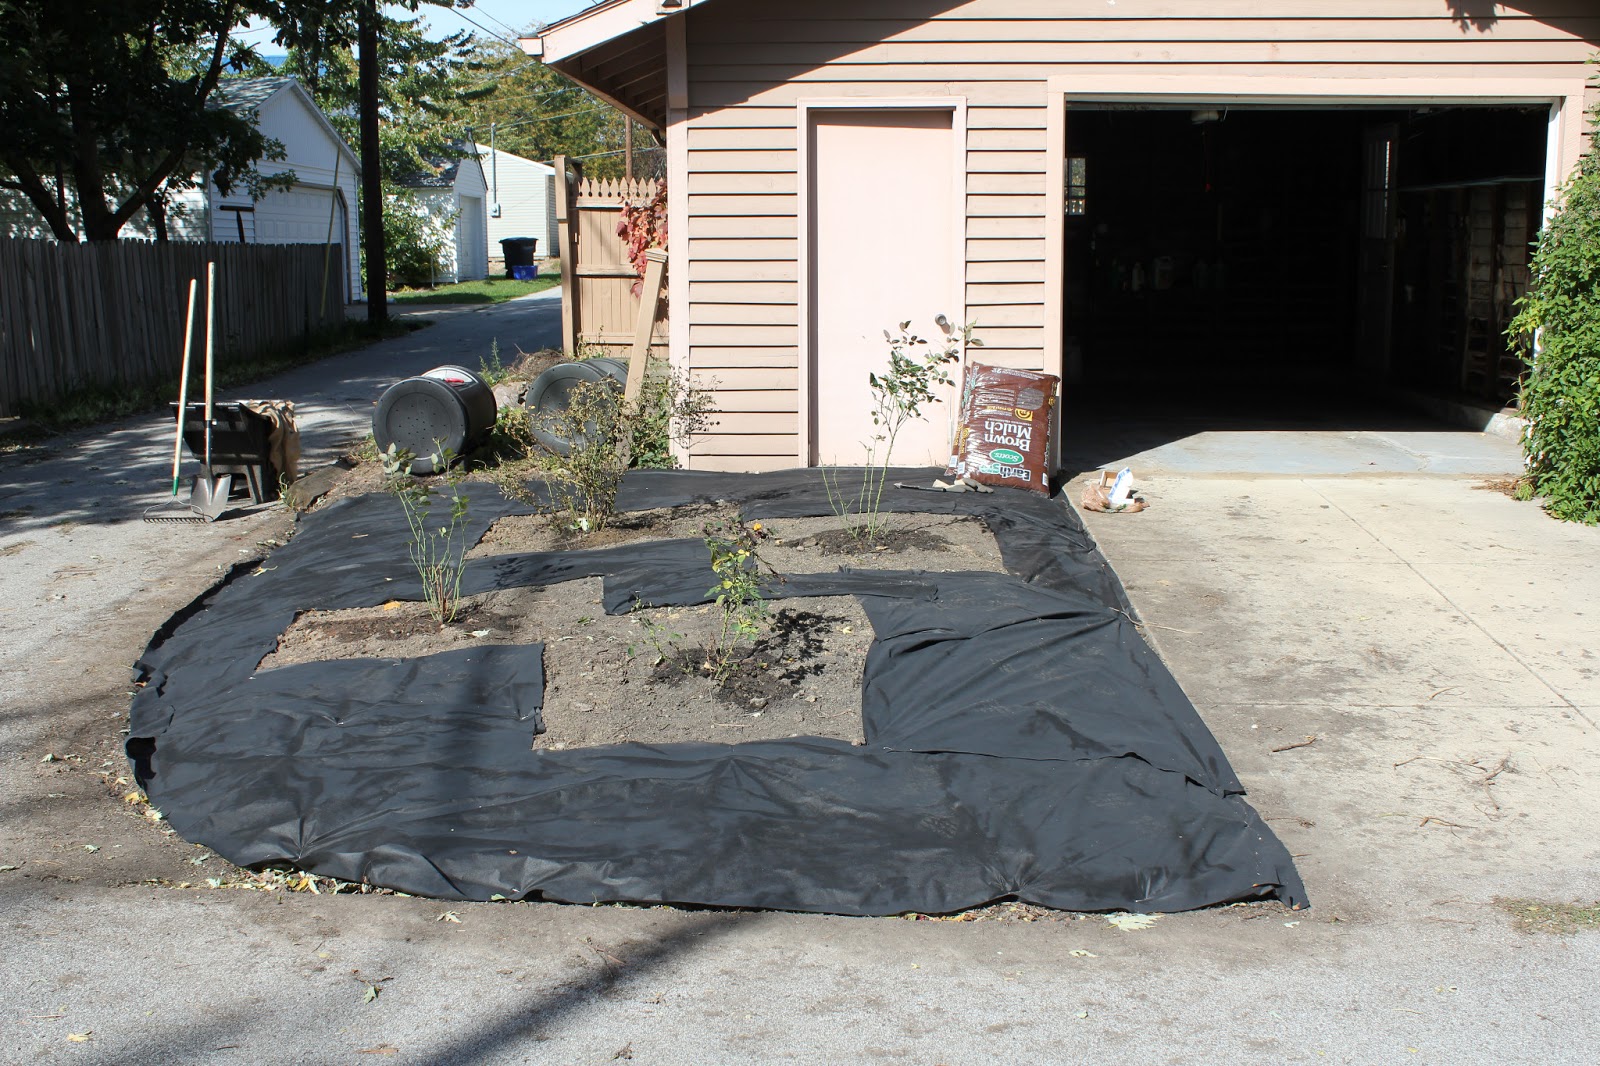
Once things were mostly dead after two applications of the weed killer, we pulled everything out of the garden, getting as much of the roots as we could, especially for the purple profusion. It seems to spread easily and just doesn't die! We smoothed out the area and pulled out all of the rocks and the random post as well. While they did make a reasonable outline for the area, we wanted a tightly controlled small garden with just the four rosebushes. The grade is low enough that a dark mulch against the street should be as much of an outline as we need, no rocks or bricks or other measures necessary. Hopefully the removal of the post does not cause people to drive over the garden area, but that shouldn't be a problem given the low amount of snow we're likely to see here (update: now that we've had it out for so long - people do not care and drive over the mulch to cut the corner. We need to figure out some kind of "don't drive here" barrier for this and also the corner in front of the house which people drive through despite it being an enormous pothole). When the garden was clear and level, we carefully placed the four bushes, which required much discussion, consideration of how tall and round each bush will eventually get, and a Skype call to Lee's parents to be sure we weren't missing anything regarding plant spacing and had placed the bushes well.


Next was planting the bushes. In order to give each rosebush the best chance of taking root and growing large and healthy, we dug extra-deep and -wide holes to mix compost with the dirt surrounding the bushes' roots. We didn't need to till it into the whole area like with the front garden since we're not planning to have plants covering the space. The soil back here was already pretty healthy. We placed each plant, re-smoothed and -graded the garden, and generously watered the roses and gave them a dose of Miracle-Gro Transplant Solution. We were planting a bit later in the season than we should have and wanted to give our roses every bit of help they could get!


Next, we covered the area in high-quality plastic to keep anything we missed from breaking the surface except for a 3-4 foot radius around each rosebush. We kept large open areas for each bush because they will grow fairly large and we want water and nutrients to easily get at the roots. While digging up the plants we did not want and preparing the sites for the roses, we found a lot of what looked like garlic cloves, maybe garlic, maybe wild leeks, we're not sure. We removed as many as we could, but obviously missed some. Like the purple profusion, they don't seem to care about Roundup. Ideally, we've now dug them all out and should have minimal future upkeep, aside from cutting off the dead roses to keep the blooms going and pruning as needed in the spring (following this guide from Uncanoonuc Mountain Perennials).


Finally we laid mulch and considered it complete:


The three plants from New Hampshire survived the travel and hanging out in pots in the backyard for months; we did lose one (Vavoom) over the winter when a trash bag that was loose in the street got caught in it and the wind cracked most of the canes below ground level. We got a replacement shipped in as an early birthday present for Lee and we now have gorgeous blooms, most of which should keep blooming all the way through until the frost hits this fall.  We finally have a picture that they're all simultaneously blooming in:


We chose four very different roses to give us variety in our small rose garden. The four we have are 'Elena' (large with white blooms), 'The Prince' with amazingly purple blooms, 'For You With Love' with orange blooms (to replace the orange Vavoom), and one random tea rose that came with the house.

All in all, it's an excellent little garden and we're quite happy with it.  The neighbors agree it is far superior to the weeds and as the roses get bigger and more full (and get pruned into better shapes) it should hopefully keep getting better.


Friday, June 28, 2013

Homeownership +1

Quick entry to say that I successfully fixed a broken major household appliance and feel my homeowner credibility has consequently been boosted.  It was a pretty simple fix but this may actually contribute to an inflated sense of competence because I had all the correct tools and knew what to do for each step.  If you don't need further details on this mundane occurrence, I'd suggest not reading further.

On Tuesday I was working in my office (at home, I don't have a school office during the summer) and heard a very substantial "THWACK" sound from the other side of the house.  I went looking for the source, figuring the cats had just knocked something BIG over or down somehow, but the cats weren't running away and looked pretty innocent, so I put that theory aside for a moment.  I went through all the rooms looking for the victim but didn't find anything and eventually thought to myself "Let's hope I never find out what made that sound".

That lasted about two hours, when I opened the dishwasher, when problems became immediately visible.

 A full load of dishes covered in very fine powder, presumably detergent.

 Not ready for use.

The problem was easily visible - the heater sheath had exploded and thrown heating coil out into the tub.  Examination of the rest of the sheath showed considerable rust - my theory is that at the part that exploded a pinhole leak developed, water touched the element, thermal stresses tore it apart, and then steam overpressurized the sheath and deformed the surrounding section outward from the initial point of failure. This failure was fairly disheartening after the microwave gave up the ghost last week, though it should be admitted that both appliances were quite old and in generally crappy condition prior to failure.  I'm just waiting for the stove and fridge to die on us in sympathy now, to complete the failure of everything in the kitchen.

 I had confidence that this was the problem.


Fortunately, the easy-to-diagnose problem also had an easy fix.  I looked up the model of dishwasher, found the part number for the heater, and located a spare on Amazon for $37 shipped.  Powering off the dishwasher was more interesting as they'd wired it directly into the circuit instead of using a plug and outlet.  This meant we finally spent the time to figure out the circuit breakers, the labeling for which was misleading at best.  The one labeled 'front room' was actually the kitchen, and one of the two labeled 'kitchen' ('east kitchen' actually) doesn't seem to be connected to anything at all.  Other discoveries of note include the fact that my office is on at least two different circuits, one for the outlets and one for the light.  

After confirming that the dishwasher was unpowered with my live-circuit-checker (correct tool #1) I used my headlamp (correct tool #2) to see into the service area, where I determined that I would need to remove two hex nuts securing the heating element from the bottom.  I used an adjustable crescent wrench to get an approximation of the size of the nut, then selected a half-inch hex socket with extended body and quarter inch drive to do the job (perfectly correct tool #3 - I had just bought a three-hundred-socket set the week before and was very pleased with myself to have precisely the correct socket on hand).  Access was still troublesome, but I'm pretty sure removing the old heating element, putting the new one in, and putting the whole thing back together took about as much time as I'd spent the night before hand-cleaning the load of dishes that were covered in detergent and the ones we'd dirtied since then. 


I'm glad I didn't just throw the whole thing out and buy a new one - it would have been more work!  All in all, a fairly minor and uninvolved job but I am far too pleased with myself about it and Ana said I had to take pictures of it so I figured I'd put it on the blog.  

The microwave I've been avoiding dealing with so far - we had our convection/microwave oven from Japan set up already so we switched to using that one.  I'm less sanguine about repairing the broken one and I don't want to replace it so I'm firmly to "stall" on that front for the time being.  I really don't want to start replacing stuff in the kitchen because that project will inevitably descend into my ripping down to the studs and replacing everything everything everything in there with better stuff, which I have not the time nor the money for. With the dishwasher fixed "stall" remains an option I may exercise for some time.